Using the Dashboard HTML Panel Widget
The HTML Panel Widget can be added to your dashboard and is used frequently for a variety of purposes.
- Making an announcement
- Launch Buttons
- Providing links to processes or external pages
- Displaying videos
- Adding third-party widgets
Adding an HTML Panel Widget
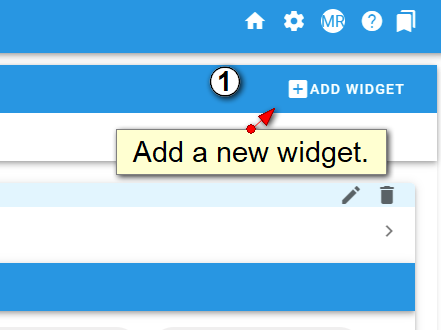
Open the Dashboard editor and select Add Widget from the upper right of the Dashboard area.
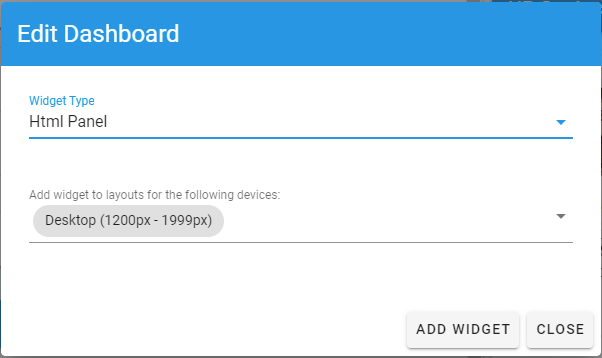
Select HTML Panel.
Editing the HTML Panel
The HTML panel provides a rich text toolbar similar to a word processor but scaled down. You can format text, insert images, insert videos, add links and more.

Tip: Extending the HTML Widget with Styling
Styled Layouts
You can use inline styles and DIVs to create layout containers and tables with more flair.
For instance something like this:
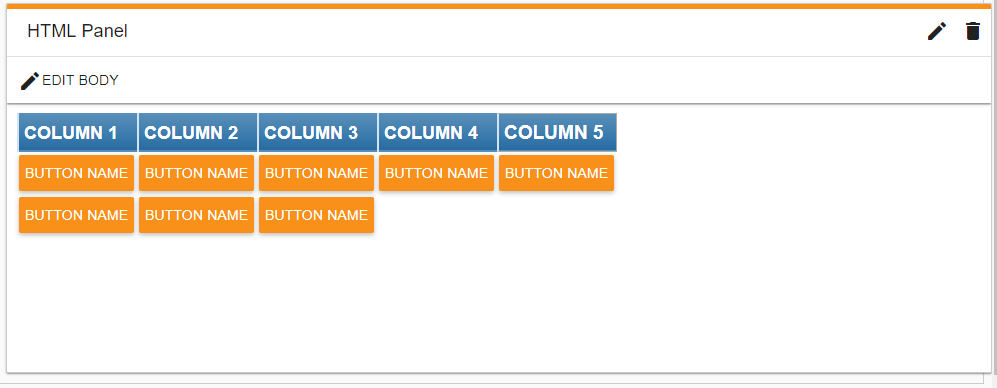
We created a table using DIVs and added some class styles to achieve this effect. The code we used is below. To create the buttons, see the previous tip. Of course, feel free to experiment!
<div class="divTableHeading" style="display: table-header-group; background: linear-gradient(to bottom, #5592bb 0%, #327cad 66%, #1C6EA4 100%); border-bottom: 2px solid #444444;">
<div class="divTableRow" style="display: table-row; background: #00000;">
<div class="divTableHead" style="display: table-cell; border: 0px solid #AAAAAA; padding: 5px 5px; font-size: 18px; font-weight: bold; color: #ffffff; border-left: 2px solid #D0E4F5;">COLUMN 1</div>
<div class="divTableHead" style="display: table-cell; border: 0px solid #AAAAAA; padding: 5px 5px; font-size: 18px; font-weight: bold; color: #ffffff; border-left: 2px solid #D0E4F5;">COLUMN 2</div>
<div class="divTableHead" style="display: table-cell; border: 0px solid #AAAAAA; padding: 5px 5px; font-size: 18px; font-weight: bold; color: #ffffff; border-left: 2px solid #D0E4F5;">COLUMN 3</div>
<div class="divTableHead" style="display: table-cell; border: 0px solid #AAAAAA; padding: 5px 5px; font-size: 18px; font-weight: bold; color: #ffffff; border-left: 2px solid #D0E4F5;">COLUMN 4</div>
<div class="divTableHead" style="display: table-cell; border: 1px solid #AAAAAA; padding: 5px 5px; font-size: 19px; font-weight: bold; color: #ffffff; border-left: 2px solid #D0E4F5;">COLUMN 5</div>
</div>
</div>
<div class="divTableBody" style="display: table-row-group;">
<div class="divTableRow" style="display: table-row;">
<div class="divTableCell" style="display: table-cell; border: 0px solid #AAAAAA; padding: 3px 2px; font-size: 13px;"><button onclick="Integrify.startRequest({process_sid: 'ENTER SID'})" class="theme-primary md-raised md-button md-ink-ripple">BUTTON NAME</button></div>
<div class="divTableCell" style="display: table-cell; border: 0px solid #AAAAAA; padding: 3px 2px; font-size: 13px;"><button onclick="Integrify.startRequest({process_sid: 'ENTER SID'})" class="theme-primary md-raised md-button md-ink-ripple">BUTTON NAME</button></div>
<div class="divTableCell" style="display: table-cell; border: 0px solid #AAAAAA; padding: 3px 2px; font-size: 13px;"><button onclick="Integrify.startRequest({process_sid: 'ENTER SID'})" class="theme-primary md-raised md-button md-ink-ripple">BUTTON NAME</button></div>
<div class="divTableCell" style="display: table-cell; border: 0px solid #AAAAAA; padding: 3px 2px; font-size: 13px;"><button onclick="Integrify.startRequest({process_sid: 'ENTER SID'})" class="theme-primary md-raised md-button md-ink-ripple">BUTTON NAME</button></div>
<div class="divTableCell" style="display: table-cell; border: 0px solid #AAAAAA; padding: 3px 2px; font-size: 13px;"><button onclick="Integrify.startRequest({process_sid: 'ENTER SID'})" class="theme-primary md-raised md-button md-ink-ripple">BUTTON NAME</button></div>
</div>
<div class="divTableRow" style="display: table-row;">
<div class="divTableCell" style="display: table-cell; border: 0px solid #AAAAAA; padding: 3px 2px; font-size: 13px;"><button onclick="Integrify.startRequest({process_sid: 'ENTER SID'})" class="theme-primary md-raised md-button md-ink-ripple">BUTTON NAME</button></div>
<div class="divTableCell" style="display: table-cell; border: 0px solid #AAAAAA; padding: 3px 2px; font-size: 13px;"><button onclick="Integrify.startRequest({process_sid: 'ENTER SID'})" class="theme-primary md-raised md-button md-ink-ripple">BUTTON NAME</button></div>
<div class="divTableCell" style="display: table-cell; border: 0px solid #AAAAAA; padding: 3px 2px; font-size: 13px;"><button onclick="Integrify.startRequest({process_sid: 'ENTER SID'})" class="theme-primary md-raised md-button md-ink-ripple">BUTTON NAME</button></div>
<div class="divTableCell" style="display: table-cell; border: 0px solid #AAAAAA; padding: 3px 2px; font-size: 13px;"> </div>
<div class="divTableCell" style="display: table-cell; border: 0px solid #AAAAAA; padding: 3px 2px; font-size: 13px;"> </div>
</div>
</div>
Tables made using <DIVs> are more flexible than using straight HTML tables. However, since you can only use 'inline' CSS styles (rather than a linked CSS style sheet) you may want to try some free tools for first creating and styling the DIV table and then turning the output into inline styles:
- DIVTable.com provides an easy tool for creating styled tables.
- Emogrifier provides a way to merge CSS Style Sheets with HTML to create inline styles.
Note: These sites are not affiliated with Integrify and are intended for informational purposes only.