New Feature Preview: Process Builder Redesign
Our venerable Process Builder, the hub of Integrify, has gotten a facelift that will roll out to customers in September. As many long-time customers know, the look and feel of Integrify’s core tool have seen little change over the years. While it’s always gotten the job done, as we continue to improve the usability and appearance of the application, it was time to consider what we could do to improve the way customers build processes, starting with the look and feel.
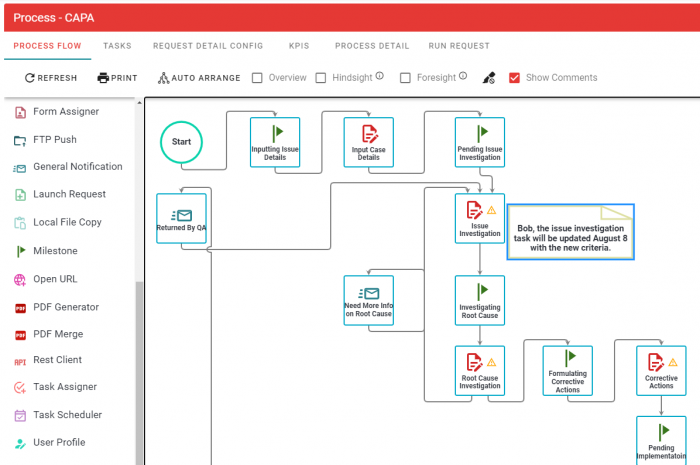
The New Process Builder
Skip to functionality differences
Usability
While the process builder has always been able to get the job done, the experience of dragging, hovering, and connecting tasks can sometimes feel a bit awkward. Menu flyouts sometimes disappear too quickly, and tasks sometimes don’t drop precisely where you need them.
We wanted to improve the overall experience of building processes to save time and reduce frustrations.
Readability
The current process builder uses solid colors to fill each shape. While distinctive, it can lead to readability issues with the task labels, especially for those with vision disabilities—the task types need to be easily identifiable but cleaner.
We wanted to make tasks easier on the eyes and improve readability.
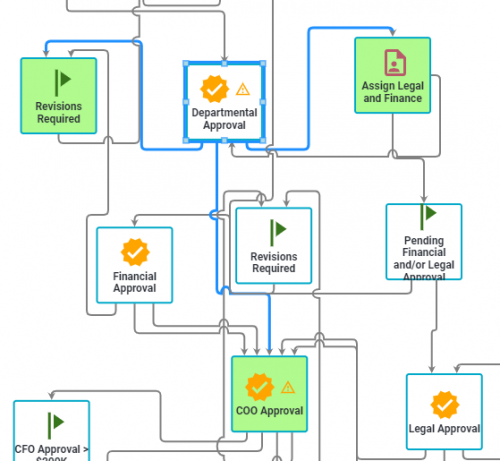
Task Shapes
When we originally developed the process builder, the shape choices for process tasks were a bit of an afterthought. While we used the familiar diamond shape for a decision point/approval, the rest of the task shapes don’t have much relevance to the task itself.
We wanted to keep tasks recognizable while standardizing the rest for a more streamlined look.
Connectors
While functional, the connectors in the current version of Integrify are a bit blocky and sometimes don’t look connected entirely to tasks.
We wanted to provide smoother connector lines that behave consistently.
What’s New?
In addition to the new streamlined, cleaner look, here are the new features coming in this release.
Foresight and Hindsight
Want to see all the tasks that will be affected by the execution status of another task?
Just select either Foresight or Hindsight and then click on any task, and Integrify will highlight all the tasks upstream or downstream that have status comparison rules based on the selected task.
Commenting
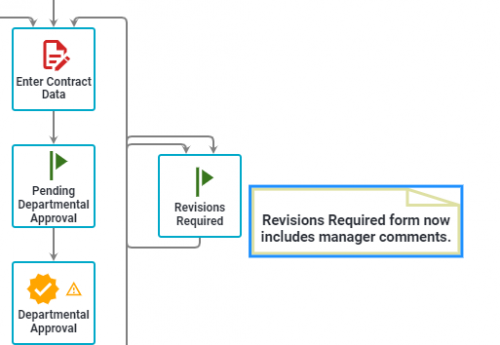
We heard from many customers that it would be great to leave comments on the process canvas. These might be explanations about how/why something was done a certain way, reminders about future edits, notes to colleagues, etc.
You can easily drag and drop a note onto the process canvas that will be visible to anyone editing the process.
Frequently Used Tasks
Your five most frequently-used tasks will now be conveniently shown in their own section at the top of the task list. This list is dynamically generated based on your usage patterns.
Overview Mini Window
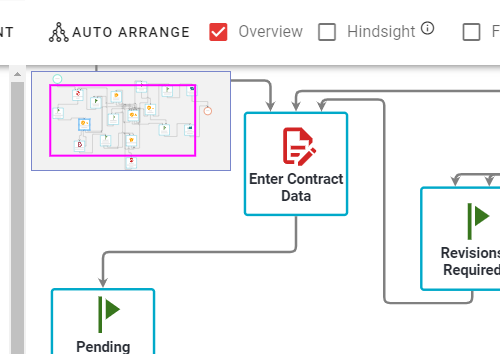
It can sometimes be a chore for customers with extensive, complex processes to scroll around and find specific parts of the process to edit.
With the new “Overview Mini-Window” you can see a map of the entire process and quickly move to any part.
What's Different in This Release?
Toolbar Changes
- Refresh: Stays the same
- Print: Changed. (Consolidates print options)
- Auto Arrange: Changed. (Only two options)
- Overview: New
- Hindsight: New
- Foresight: New
- Clear Highlights: New
- Show Comments: New
- Zoom: Gone (Replaced by Overview)
- Connection Style: Gone
- Indicators: Gone
- Clicking on Connectors no longer displays rules.
Functionality Changes
- To access the Task Configuration Menu, select the task and right-click on it.
- To create a connection to another Task, hover over the edge you want the connector to start from. A highlight will appear. Drag the highlighted edge to create a connector.
- To use Copy task, select the task, right-click, and select "Copy Task" (either option), then right-click where you want the task and select "Paste."
Additional Notes
- Auto-Arrange now allows you to view the new layout before accepting it. Also, it now only includes "Tree Flow - Horizontal" and "Tree Flow - Vertical." We plan to roll out additional options post-release.
- When creating a new workflow, we now include the end task by default, so you can just drag and connect to it instead of using the task configuration check box.
- There is a change to the Configuration and Recipient icons displayed on Tasks. Previously we displayed a cog icon representing the Task Configuration and a person icon for Recipients. By default, we displayed a red "!" to represent the task's unconfigured state. After adding configuration and recipients, the red "!" would disappear. Now, we only display a warning icon that replaces both. It will display if anything for that Task needs to be set (configuration or recipients). Otherwise, it disappears.
- The "When this process completes, the process will end." checkbox was removed from the edit detail. This is because you now start with a non-deletable end task shape already on the diagram when you create a new process. If you started with a process converted from an older diagram that didn't have the end shape, the end task shape will be available for drag and drop on the left palette.
Keyboard Commands
Note: On a Mac, the Command key is used as the modifier instead of the Control key.
- Del & Backspace - delete selection
- Ctrl-X & Shift-Del - cut selection
- Ctrl-C & Ctrl-Insert - copy selection
- Ctrl-V & Shift-Insert - paste
- Ctrl-A - select all
- Ctrl-Z & Alt-Backspace - Undo
- Ctrl-Y & Alt-Shift-Backspace - Redo
- Up & Down & Left & Right (arrow keys) - scroll
- PageUp & PageDown - scroll diagram
- Home & End call - scroll diagram to top/end
- Keypad-- (minus) - decrease zoom
- Keypad-+ (plus) - increase zoom
- Ctrl-0 - reset zoom
- Shift-Z - zoom to fit; repeat to return to the original scale and position
- F2 - edit text block/label (of selected task)