Using The Excel Import Task to Enhance Your Automation
In today's rapidly evolving business landscape, optimizing workflows and streamlining processes is critical, and harnessing the power of Excel in conjunction with a versatile platform like Integrify can be a game-changer. As your organization seeks efficient solutions to enhance your operational efficiency, the seamless integration between Integrify and Excel emerges as an indispensable tool to leverage your existing processes for capturing and sharing data within the organization and further automate through Integrify.
Excel Import
Often, organizations will have procedures in place that result in a spreadsheet of data being passed around between different team members, updated, and emailed from person to person with no actual paper trail or tracking into the status of any one item. Instead of reinventing the wheel and building the process from scratch, Integrify allows you to create a process in which you import that existing spreadsheet, map the cells to data fields on a web form, and then continue to further optimize and automate using Integrify's powerful workflow development toolkit. This allows for a streamlined end-user experience and auditing and tracking of processes within your organization, meaning nothing ever gets lost in someone's inbox again.
To configure the Excel Import task, there are a few simple steps to follow:
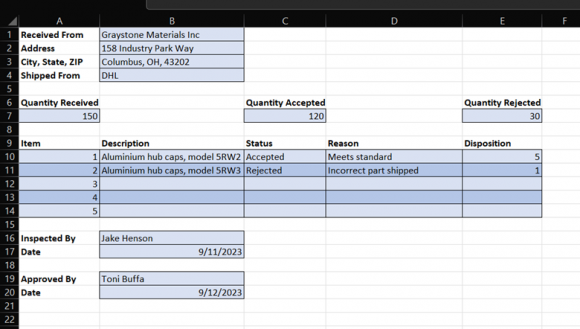
1. Identify the format of the Excel spreadsheet you are looking to configure for import in your process (in our example, we have a parts inspection spreadsheet).
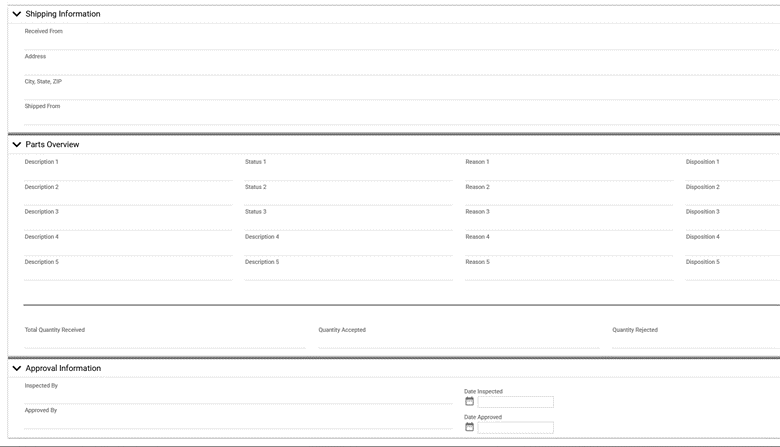
2. Design a simple form through the Integrify platform that contains fields for each data element you want to capture from the spreadsheet.
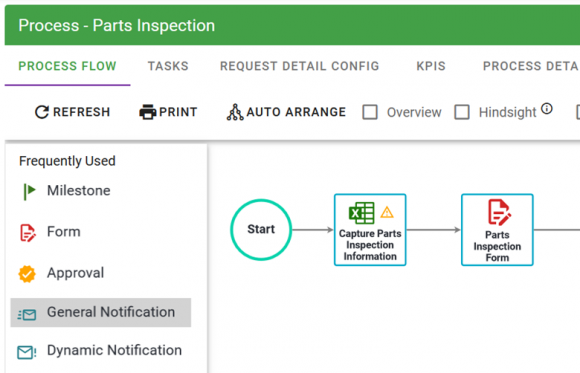
3. In the Process Designer (Administration -> Processes), drag in an Excel Import task from the list of task types.
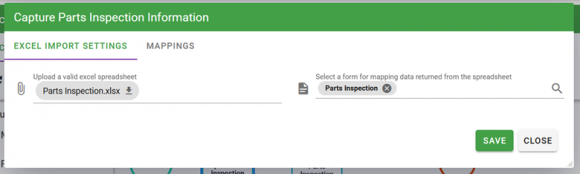
4. Configure the Excel Import task by providing the following:
a. A template of what the imported spreadsheet will look like (you can use the example spreadsheet you used to develop your form!)
b. Mappings between the fields on your form and the cells in the spreadsheet
5. Hit "Save” and you're done!
In minutes, you can create a process that takes data from spreadsheets you're already using, move the data into our online platform, and use this data to drive workflow decisions.
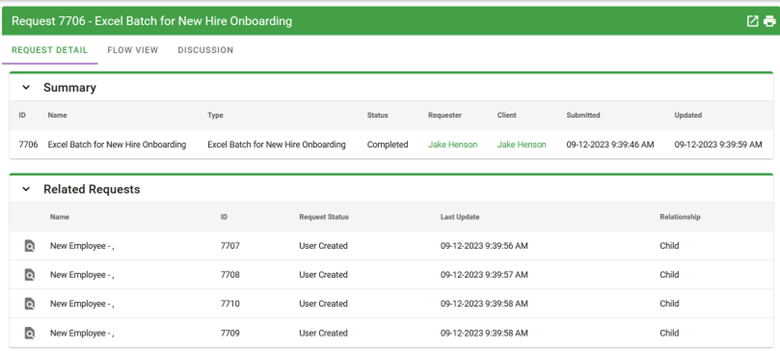
Excel Batch
Many standard procedures within organizations end up involving tedious clerical work to enter and capture many records in a system. For example, your team may process new customers or leads in a CRM database and need to track the same essential information for each record, or you might have an employee onboarding process where dozens of users are coming in, and each needs to follow the same steps to get set up in your system. Instead of having to initiate a new process manually for each instance, there's a powerful workflow task that allows you to submit a single Excel sheet with the relevant data for each record. Integrify will seamlessly capture each row of data as a new request in the system, eliminating any unnecessary keying in of data and clerical errors.
To get started with the Excel Batch task, there's a few easy steps to set things up:
1. Identify the Integrify process that you want to automate with the Excel Batch and be sure this process has a form task as an initial step in the workflow chart.
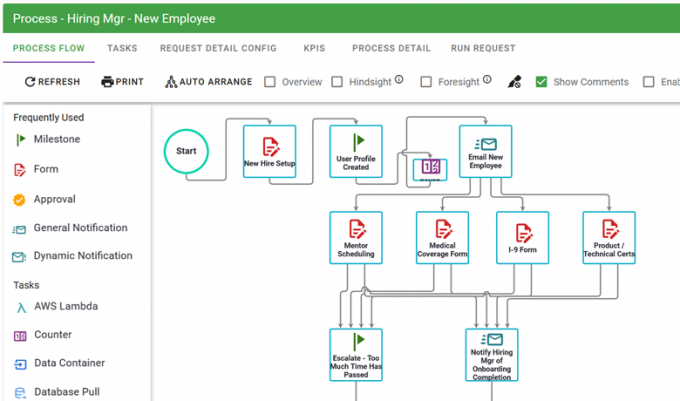
2. You will also need to have an Excel sheet format ready to go, with each column representing a field on your Integrify form and each row representing one instance of the process you are kicking off (in our example, we are initiating an employee onboarding process).

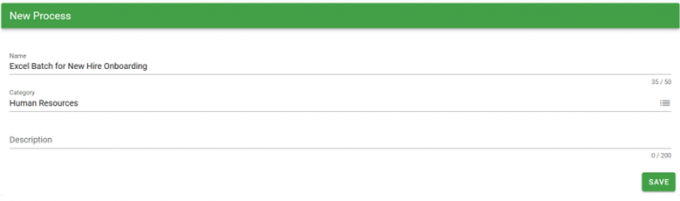
3. In the Processes administration menu (Administration -> Processes), add a new process that we will use to upload the Excel document for processing. Give it whatever name is relevant to your team/process.
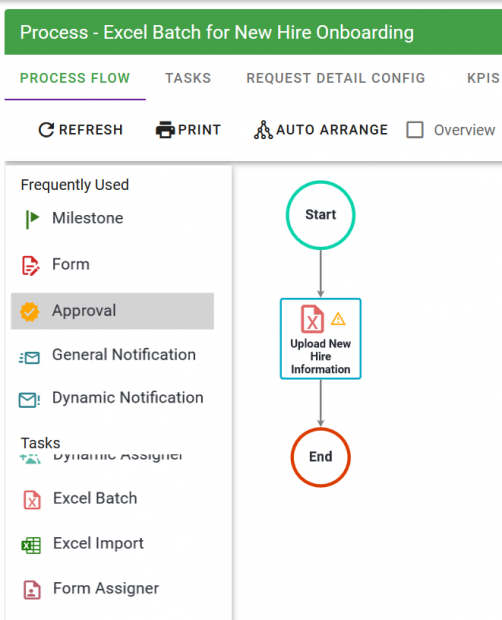
4. In the workflow designer, drag in an Excel Batch task and connect it to both the Start and End tasks.
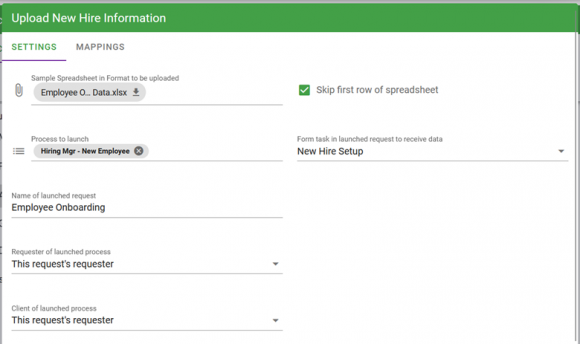
5. In the task configuration for the Excel Batch task (right-click on task -> Configuration -> Configure Task), provide the following information:
a. Upload a sample spreadsheet of data with the format of the rows and columns you use to import records (e.g., the spreadsheet from step 2).
b. Select the process being launched and the form on that process that is going to capture the data coming in from the Excel Batch task.
c. Provide a request name to be assigned when the task is launched.
d. Map the requester and client of the child requests as needed.
e. If the spreadsheet you are using has headers, be sure to select the “Skip first row of spreadsheet” checkbox.
6. Hit “Save” on the dialog and go to the Mappings tab. A list of the fields from the form you selected in the Settings tab should be displayed.
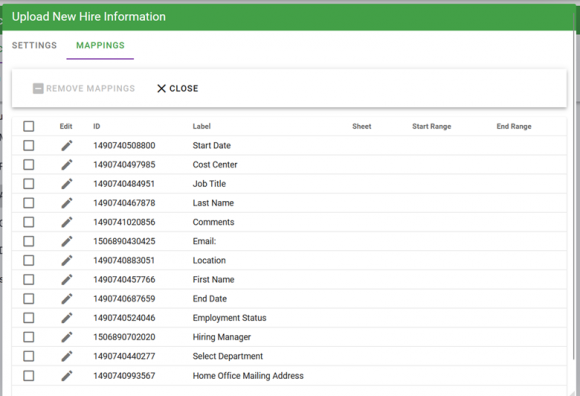
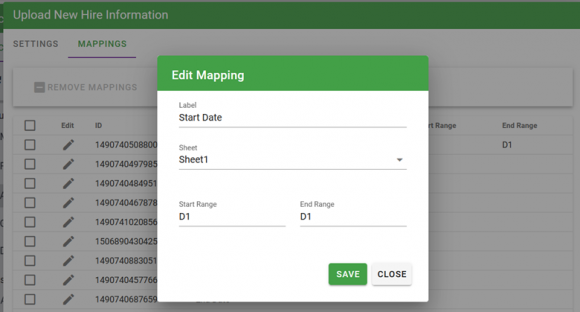
7. For each field you have data to capture, click the pencil icon and select the sheet and column that contains the data being pushed into the selected field
8. Be sure to assign the Excel Batch task to a user responsible for uploading the spreadsheet into Integrify (typically, this task is assigned to the requester of the process, but can be set to whoever is necessary for your team)
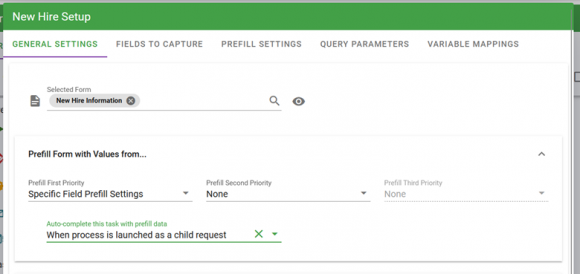
9. On the child process, go to the form task configuration of the form that you configured to receive data, and be sure to set the task to auto-complete when the process is launched as a child request.
You are now set up to begin processing batches of records in Integrify! Any time you have a set of records that needs to be linked to individual processes in the system, all you have to do is kick off the Excel Batch process you created, upload a document with rows of data, and in seconds, your processes will be initiated and running!
Final Thoughts
Your organization is likely already leveraging the power of Microsoft Excel to capture business data and drive everyday decision-making. Instead of making users have to start from scratch and learn a new tool all over again to make these decisions, Integrify gives your organization the power to integrate seamlessly with Excel to automate and streamline your workflows. With the Excel Import and Excel Batch task types, you can make a huge impact in enhancing efficiency, reducing errors, and promoting collaboration across your organization.