Adding Tables to Email Notifications
If you'd like to add a table to your email notifications you can do it two different ways, which we outline below.
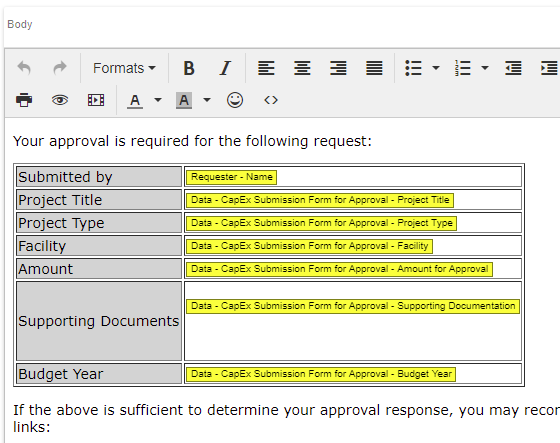
Here's an example of a table in an email notification. It can help structure content like labels and fields:
Method #1 - Using the Visual Editor
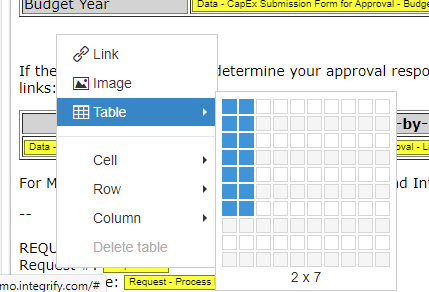
- Go to a blank spot in your email and right-click. You will see a number of options appear.
- Select "Table" and then drag across the grid to select the number of columns and rows you want.
- In the example above there are two columns and seven rows so that's what we've selected.
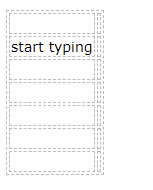
The table will appear but it will be collapsed, making it a bit hard to see. Click somewhere on the table and start typing to spread out the columns and make it easier to place your cursor.
Method #2 - HTML Code
Another way to add a table is to use the HTML Code Editor which you can access by clicking on the <> icon in the toolbar.
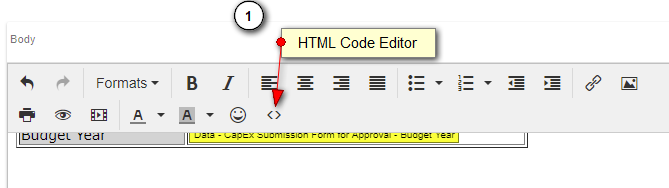
This will open up a "Source Code" window that reveals all of the HTML Code behind the email. You can then find the place in the code where you want your table and copy/paste the example below into the HTML Code Editor.
<table border="1">
<tbody>
<tr>
<td bgcolor="#D3D3D3">Submitted by</td>
<td>REPLACE WITH FIELD</td>
</tr>
<tr>
<td bgcolor="#D3D3D3">Project Title</td>
<td>REPLACE WITH FIELD</td>
</tr>
<tr>
<td bgcolor="#D3D3D3">Project Type</td>
<td>REPLACE WITH FIELD</td>
</tr>
<tr>
<td bgcolor="#D3D3D3">Facility</td>
<td></td>
</tr>
<tr>
<td bgcolor="#D3D3D3">Amount</td>
<td>REPLACE WITH FIELD</td>
</tr>
<tr>
<td bgcolor="#D3D3D3">Supporting Documents</td>
<td>
<p>REPLACE WITH FIELD</p>
</td>
</tr>
<tr>
<td bgcolor="#D3D3D3">Budget Year</td>
<td>REPLACE WITH FIELD</td>
</tr>
</tbody>
</table>
<p></p>
When you click on "OK to close the HTML Code Editor, you will see a table appear and you can begin editing it.