Creating a Table Maintenance Process
Please Note: All of the files referenced in this article are available in the .ZIP file at the bottom of the article. This article is intended for advanced Integrify users with some development experience
This article is a companion to our webinar, "Managing Tables with a Grid or Process," where we discussed two different solutions for building your own Integrify process to make updates to a data table.
You can download the files referenced below (at the bottom of this article in a .ZIP file) and import them into your Integrify instance to see the sample processes in action.
Installing and Using Sample Table Maintenance Processes
Note: By convention, we place the reports that support forms into a separate category named “Form Data Reports.” This is not a requirement but makes locating these reports easier.
Table Maintenance with Grid Process
This process uses an Integrify grid question to help display and manage a table of data for use in other parts of your Integrify installation. The form holding the grid has custom JavaScript that manages the user’s choices to create, edit or delete records. Unlike the other process, all changes are queued up in the grid object and the changes are only saved to the database when the form is submitted. The table will be empty initially, but you can fill it by using the process itself.
Installation
Import the process file named Grid_for_Custom_Table_Maintenance.json to create the needed workflow. In the Integrify database or (if you have the private database option) in your private database, create the Cust_Part_Tech list table using the Cust_Part_Tech.sql file included in the installation package. You may need the Integrify support team to help install this file if you do not have access to a private database.
You will also need to import one custom report via the import file named cust_part_tech_list.irml and name the resulting report cust_part_tech_list as there is code in the process that searches for this particular name. Changing this name will require changes to the javascript in the form listed below and is beyond the scope of this document.
Form Task ‘Accept Changed to Parts Table’
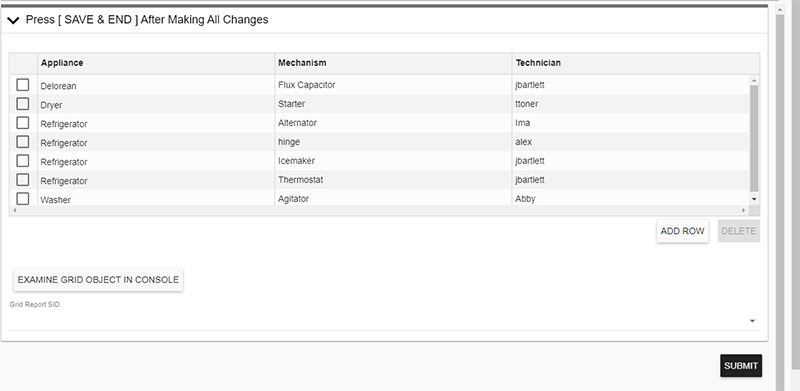
The button labeled “EXAMINE GRID OBJECT IN CONSOLE” allows you to use your browser’s debugging tool to examine the structure of the JSON object that the grid creates when it stores its data in the Integrify database. It’s not necessary for the full functionality of this example but is useful if you want to know how the grid’s data is packaged for storage.
DB Push Task ‘Replace Cust_Part_Tech table with Updated Grid’
The SQL statement below takes in a JSON object stored in the Integrify database and converts it into a dataset that can be used to
SQL statement in the DB Push task:
--delete previous interim tables
DROP TABLE IF EXISTS [CUST_PART_TECH_NEW];
--copy the data from the just-completed grid
--into a new table named cust_part_tech_new
--this statement also parses the JSON object
--that the grid data is stored in for insertion into the new table
select derived.* into [CUST_PART_TECH_NEW]
from (
SELECT *
FROM OPENJSON (@GRID, N'$.gridCellValues')
WITH (
Appliance varchar(100) N'$.Appliance.Answer', -- Select List
Mechanism varchar(100) N'$.Mechanism', -- Short Text
Technician varchar(100) N'$.Technician'
) ) derived ;
--delete any existing backup tables
DROP TABLE IF EXISTS [CUST_PART_TECH_OLD];
--make the previous data table into the backup copy
EXEC sp_rename [CUST_PART_TECH], [CUST_PART_TECH_OLD];
--make the newly created table the current data table
EXEC sp_rename [CUST_PART_TECH_NEW], [CUST_PART_TECH];
Vendor Maintenance Process
This process uses an Integrify search box question and a series of matching fields to create new records and edit or delete existing records in the specified table. Each time the save or delete button is pressed, the process performs a database update immediately in the background using a parallel process path. The form task remains active for further updates.
Installation
Import the process file named Vendor_Maintenance.json to create the needed workflow. In the Integrify database or (if you have the private database option) in your private database, create the Cust_Ship_To table using the Cust_Ship_To.sql file included in the installation package. You may need the Integrify support team to help install this file if you do not have access to a private database.
You will need to update the “use [70_demo2];” statement in the SQL code that is embedded in the task named Make Backup of Ship_To Table to match your database environment, or the backup step may fail. You will also need to update the javascript code in the form that supports the Edit Ship_To table form task. The beginning part of each insert, update, and delete statement has a reference to a database named [70_demo2] which needs to be removed or updated to match your environment. You will also need to make a similar change in the database query supporting the search box question on the main record editing form.
This process can be downloaded and imported into your Integrify instance. Directions for importing processes.

Note: Processes are zipped for easier download. Click here for more information on using zip files.