Standard Task: Form Assigner
The Form Assigner gives an end-user the option to decide who will complete future specific tasks by answering questions in a form.
In addition to assigning specific recipients to other tasks, the Process Administrator can also allow the user to set (these options are explained further below):
- Due Dates
- Reminder Dates
- Time out Dates
- Start Dates (to start the task in the future)
- User Task Priority
Related Articles:
Based on user selections, the Form Assigner task can apply to user-defined assignments to future tasks in the process:
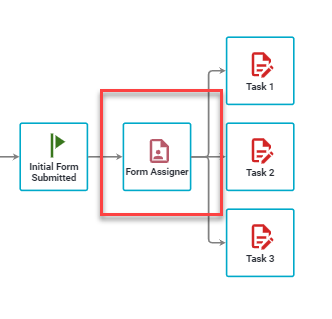
After the Form task is submitted, a Form Assigner task will execute and assign the selected individuals in the form to the appropriate tasks configured.
In addition to assigning specific recipients to other tasks, the Process Administrator can also allow the user to set:
- Due Dates
- Reminder Dates
- Time out Dates
- Start Dates (to start the task in the future)
- User Task Priority
Each of these options is explained below.
Adding a Form Assigner Task
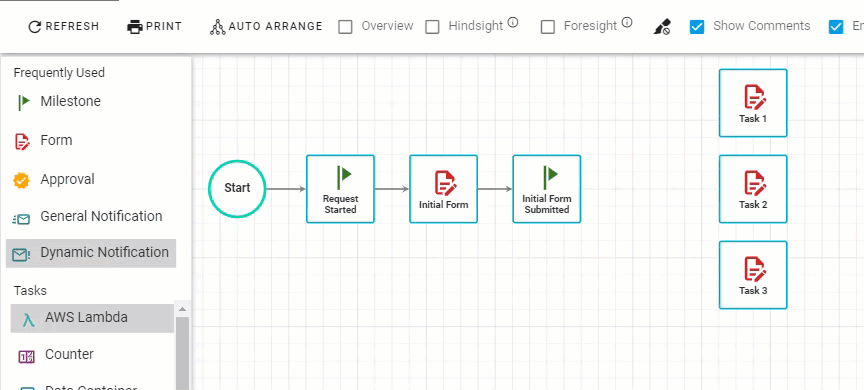
A Form Assigner task is added to your Process Flow like any other task by dragging and dropping the task onto the process.
What is different with the Form Assigner task is that it can’t be configured immediately after you have added to the process flow. It is dependent on both the task prior to it executing AND the tasks after it executes.
You will need to add the task or tasks which you would like to make assignments to before you can fully configure the Form Assigner task.
For example, in the Process Flow above, the Form Assigner task called Form Assigner Task was added to the flow but it wasn’t configured until the Task 1, Task 2 and Task 3 tasks were added. Some of the configuration attributes for these tasks will be determined by the configuration of the Form Assigner's task configuration.
Configuring the Form Assigner
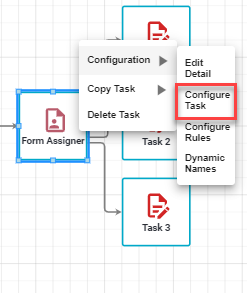
After you have added the necessary tasks to your process flow, right-click on the Form Assigner task, Under Configuration, select the Configure Task option. You will be presented with the Form Assigner Settings:
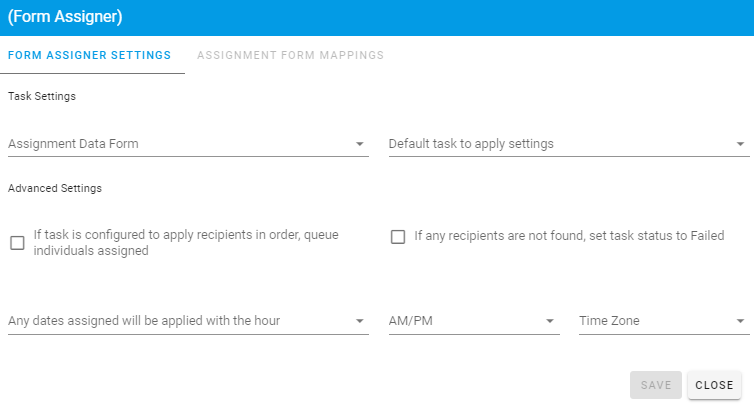
The Form Assigner Settings allow you to select which Default task to apply settings to and what Assignment Data Form task in the process you will be using to select those assignments from:

The following is a description of each attribute for the Form Assigner Settings:
| Attribute | Options | Required |
Description
|
| Assignment Data Form | Form task within your process | Yes | Select the Form task within your process that contains data elements that will define the recipients, due dates, reminder dates, etc. |
| Default task to apply settings | A task within your process flow | Yes | This is the default task in your process that you wish to assign the recipient(s) to. |
The settings in the Advanced Settings section, apply only to those mappings (see below for mappings) that are using fixed date attributes. Here you can set the hour and time zone that will apply to these mappings.
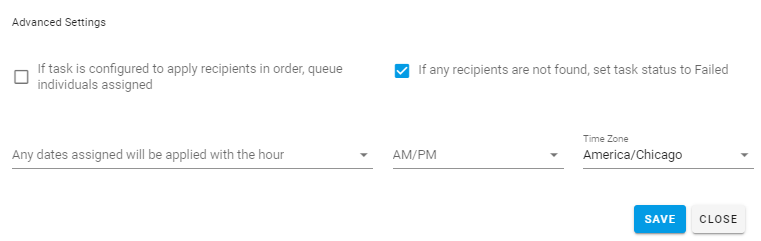
Also in Advanced Settings, the 'If task is configured to apply recipients in order, queue individuals assigned' slide button option will consider the target task where you are assigning recipients to. If the target task has the Process Rule “For All the Recipients in Order” check, then you will want to check this option. Based on the order of the recipient assignments on the Assignment Form Mappings section the Form Assigner task will ensure that those recipients are assigned in a specific order and processed accordingly.
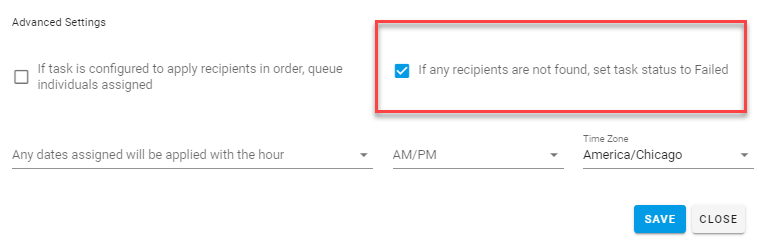
Another option in Advanced Settings will allow you to set the task status to failed if any recipient assignment is not found (i.e entered user name or id does not match a user in the system).
Under Config -> Advanced Settings - "If any recipients are not found, set task status to Failed" as shown below:
Assignment Form Mappings
In addition to the default task to apply assignments/timed-based settings to in the Form Assigner Settings tab, you also have the ability to look up other tasks in the process to make assignments to.
This gives you the ability to make assignments to multiple tasks from data entered in one Form Task. You can also apply multiple settings derived from multiple questions to a single task in your process. One-to-Many or Many-to-One.
Under the Assignment Form Mappings tab, you can add mappings for the Form Assigner.
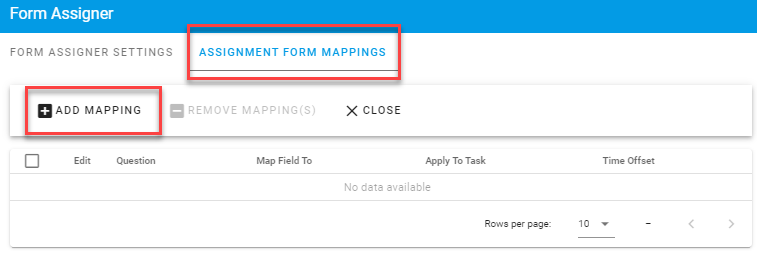
Select Add Mapping or the Edit icon for an existing field you wish to map data to a task.
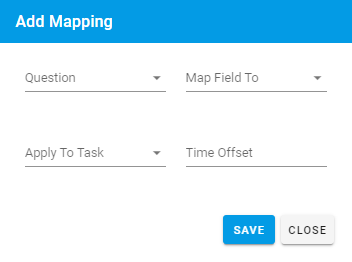
At a minimum, you will at least need to select what field on the form defines who the Recipient will be for the task you are assigning someone to.
In the example below, the question called Assign Recipient for Task 1 & 2 is selected to be the question on the form that will inform the Form Assigner task which Integrify user should be used as a Recipient for the task we assigning to (Task 1):
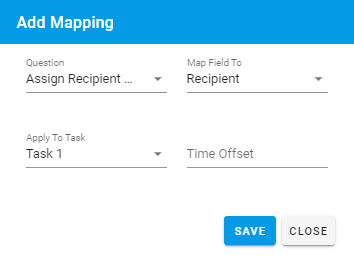
To configure any question on the form all you will need to do is click the Add Mapping button, select a question from the Form you assigned as the Assignment Data Form on the previous tab, choose the cell in the Map Field To column that corresponds to the question you are configuring, and select the task you wish to assign it to under Apply to Task.
When you have completed adding all the appropriate mappings to your tasks, be sure to click the Save button to save your settings.
The following is a detailed list of settings that may be configured based on the form data:
| Attribute | Description |
| Recipient | This is the task in your process that you wish to assign the recipient(s) to. |
| Start Date (Fixed) |
If a future date is mapped to this attribute it will alter the start date for the task. For instance, it the date is a week away then the task will not start until that date. The task will appear as Scheduled in the Request Detail and will not initiate until that date is met. |
| Due Date (Fixed) |
The date which the task will be due. This will be highlighted on the user’s dashboard under My Open Tasks. |
| Reminder Date (Fixed) | The date which the first reminder should be sent. After this initial date is met, the reminders for this task will be sent based on the intervals you have defined for the specific task. See Reminders and Timeouts for more information |
| Timeout Date (Fixed) |
The date which the task will time out and end. Note: If a task is set to timeout be sure to account for this in the business rules of the process and have task that will initiate based on this timeout setting. |
| Start After... | A numerical value assigned to this mapping will alter the start date for the task. For instance, if the numerical value is 10, then the task will start in either 10 minutes, hours, or days from now, depending on the drop down you selected. The task will appear as Scheduled in the Request Detail and will not initiate until that date is met. |
| Due After... | A numerical value assigned to this mapping will alter the due date for the task. The date which the task will be due. This will be highlighted on the user’s dashboard under My Open Tasks. |
| Reminder Every... | A numerical value assigned to this mapping will alter the reminder interval you have defined for the specific task. See Reminders and Timeouts for more information |
| Timeout After... | A numerical value assigned to this mapping will alter the date which the task will time out and end. Note: If a task is set to timeout be sure to account for this in the business rules of the process and have task that will initiate based on this timeout setting. |
| Priority | This will set the priority of the task being assigned. You can only use this assignment for user tasks (tasks that must be completed by a user, not the system) |
In addition to using a actual date value from the form, you can also apply time offsets to the date to assign values to other task attributes:

The Time Offset value will be interpreted for all map attributes except for Recipient and Priority. You can use negative or positive whole numbers with M, H, or D after it to represent minutes, hours, and days respectively.