Task Menu: Configure Rules
For any task within a process in Integrify to execute, it must be given a starting point. This starting point, or Start Rule, tells the Integrify workflow engine under what condition that a task should start.
These Start Rules are the business rules that dictate the flow of your process based on a task completing, a task completing and data entered on a form, etc.
The Process Flow visually represents these relationships by dragging a transition line between each task where the Start Rules have been defined.
As with all processes in Integrify, a default Start and End icon is added to all Process Flows.
Note: It is easiest to read an Integrify process with a top down approach. Any Transition coming into the top of the task indicates a Start Rule condition. By following that line you will arrive at the task that will initiate it.
The Configure Rules area allows you to define the Start Rules for that task. The Start Rules for any task determine how and when that task will start while the process is executing.
Start Rules are typically based on the status of a previous task (such as another task being completed) and/or the status of the previous task completing and possibly some data associated with that task such as a form question value, an approval option, etc.
In this section we will discuss:
- Configuration Editor
- Adding Rules
- Edit Rules
- Group Rules
Configure Rules Editor
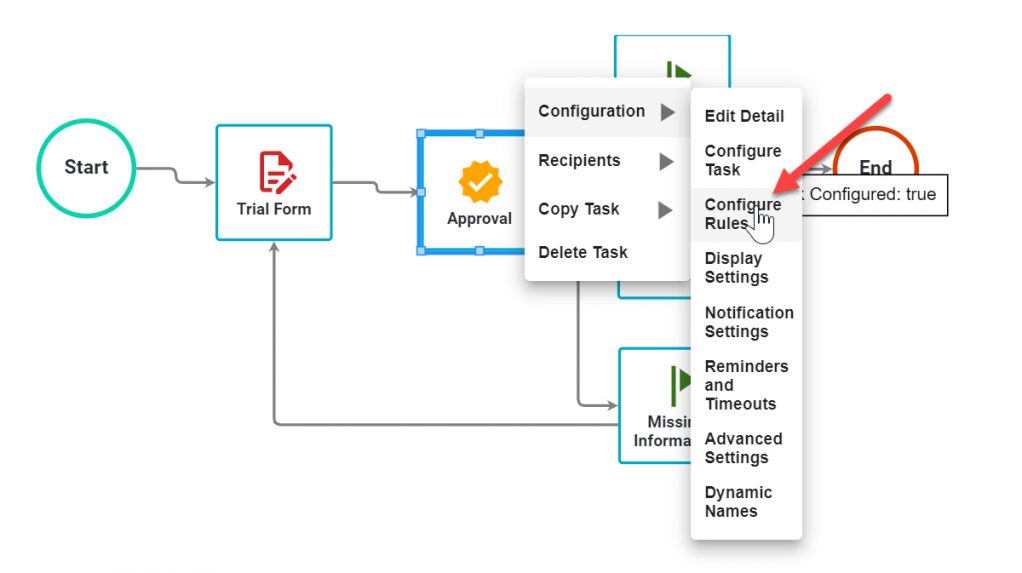
To view the Start Rules for any task, right-click on the task, hover over Configuration, and left-click the Configure Rules option:
You will be presented with the Configure Rules editor and it will display the Start Rules for the task you have selected:
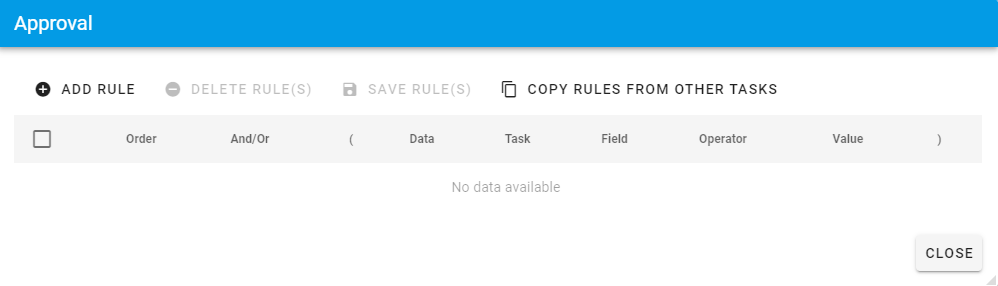
Note: When adding any task to the process design canvas, by default, the Start Rules will be empty. Unless you connect it to another task.
The Configure Rules editor is broken into two distinct areas:
- Rules: The listing of all rules defined that determine how the task starts.
- Add, Edit, or Delete Rules: The area that enables to you add, edit or delete a rule. This area is dynamic depending on the Rule Source Data you select.
Adding a Start Rule
You can configure the Start Rule for a task in 1 of 2 ways.
- Drag a transition line from one task to another by clicking on the perimeter of the task until you see a pink line and dragging it to the task you want to occur after that.
In the above example, we are dragging the transition line from the Start to the Form, then the Form to the Approval.
Simply, release to save your layout. Once you have done this, you can then view the Start Rule for the task by selecting the task's Configure Rules. You will see that adding the transition line, there was automatically a start rule added.

Note: If you want to remove the Start Rules for a given task, you can remove the transition line by selecting the transition line going to the task, and selecting the delete button on your keyboard.
2. Select a task's Configure Rules option. You will be presented with the following empty rules for the new task. Select Add Rule as follows:

You will be presented with the following to add a rule:
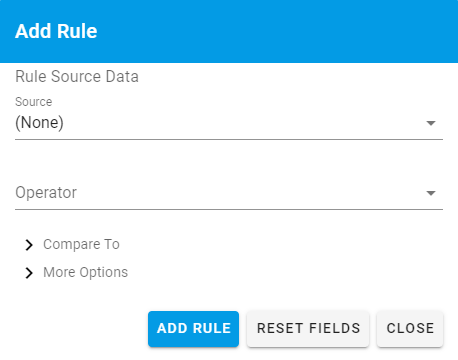
To add a new Start Rule for a task, you will first start by selecting one of the available options from the Source list:
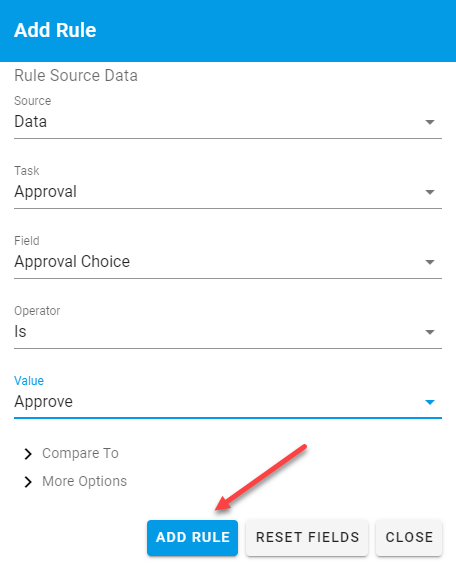
Below, we are adding a rule for the Approved Milestone task to start when the Approval choice is Approved.

The result will display:

The Source list informs Integrify whether you will be basing the new Start Rule on the Status of a task (Completed, Failed, etc), the Data (a form question value, an approval task option selection, etc), or possibly an attribute associated with the Requester of the process (Division, Department, etc).
The available Source options are as follows:
| Option | Description |
| Status | By selecting Status for Source, Integrify will present you with a list of all available tasks (in the Tasks drop-down list) in the process and the corresponding available statuses that can be used for a Start Rule. The available status Values will be either Completed, Cancelled, Excluded, Evaluated, Failed, Timed Out. |
| Data |
By selecting Data for Source, Integrify will present you with a list of all available tasks (in the Tasks drop-down list) in the process. By selecting any of the tasks, Integrify will then make available any data associated with that task, such as a question on a form or an approval task option that may be used in the Start Rule. |
| Requester, Client, Task Completer, Task Recipient, etc. |
Similar to using Dynamic Recipients for a Recipient on a task, you may also use the Dynamic Recipient to determine start rules. By selecting any of the Dynamic Recipients in the Source list you will be presented with a list of available attributes from that recipients Integrify profile. |
| Request | The Request option will allow you to base a rule on specific attributes associated with a given request such as a start date, last milestone, or even the request name. |
By selecting any option in the Source list, additional options will be populated in the Rule Source Data area.
The Field list is dynamic based on the Task selected.
In an Approval task, you would be presented with the available choices for the Approval task that were added. (Approved, Denied, Needs more information, etc.)
After you have defined your Rule Source Data configurations, you have multiple options with regard to how to evaluate the status or data.
You are presented with the type of Operator you would like to use such as Is, Is Not, Contains, etc. These operators will be applied to the Value that you select in the corresponding box:

In our example above, we will select the Is operator as we are looking for a specific Value to be selected.
The last thing you need to do when evaluating data is select the data from the Value list you are comparing against (or depending on the data it could be a free form text field to add your own Value comparison).
For the above example Approved Milestone, we only want it to execute if the user selects the Approved option that has been defined for that particular Approval task.
Once you have defined the rule option, select the Add Rule button and your new rule will be added and displayed.
Editing a Start Rule
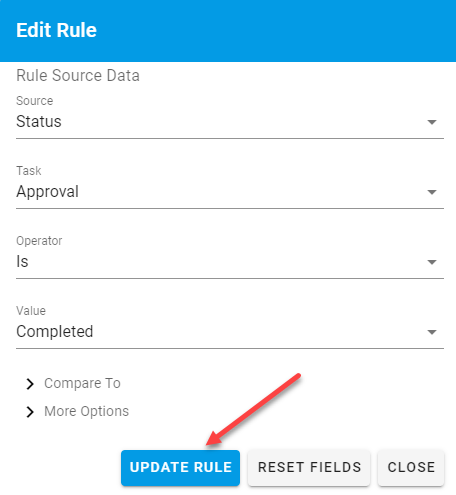
Once a rule has been created you may edit it at any time by selecting the edit (pencil) icon on the row for that particular rule:

The Rule Source Data area will be pre-selected with the options originally defined for the rule. If you would like to make a change, do so and then press Update Rule:
Note: It is not recommended to change the business rule(s) if this process has a Publish Status of Production and there are outstanding Requests executing the process definition.
Grouping Rules
In some scenarios, it will be necessary to group Start Rules into a series of conditions. This often occurs when a task has multiple ways for it to be started.
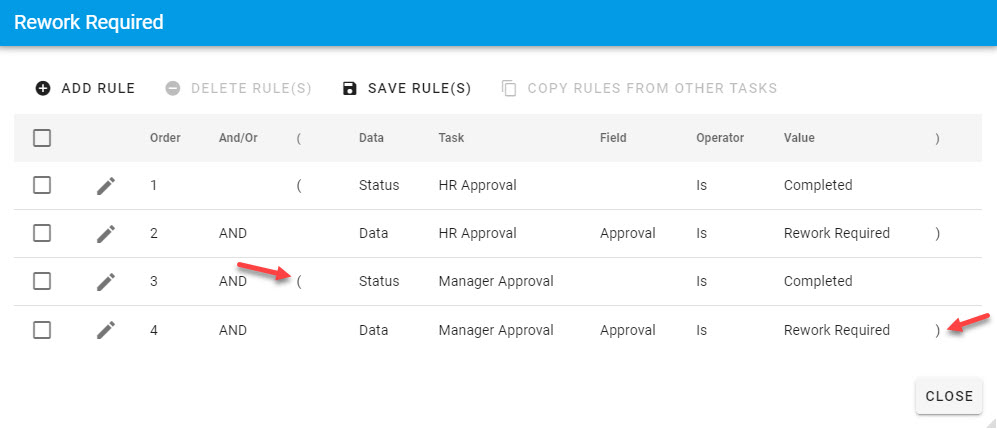
For example, the Rework Required Milestone task in the following process may be started by either the Manager Approval or the HR Approval task:
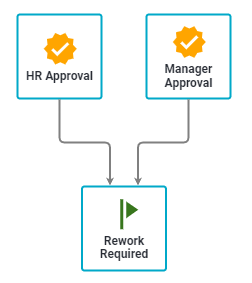
To accommodate for this type of scenario, it will be necessary to add the necessary status conditions and data conditions for the start rules for this task based on both the HR Approval and the Manager Approval tasks and also to group those rules so they are evaluated correctly.
You would first start off by adding the necessary conditions as performed above based on the HR Approval task being Completed and the user select the Rework option from that task:
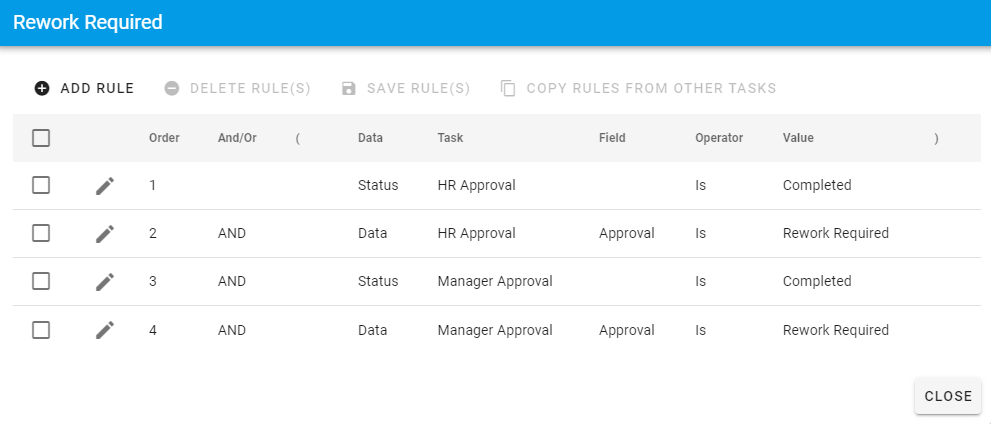
To reorder rules, you can drag and drop, or change the number under the 'Order' column.
Once the rules have been added, there needs to be some group of the rules, otherwise, the system will try to evaluate all four rules as one single condition.
We start by placing our cursor and clicking in the small text box to the left of the Status label on row 1 and adding open parentheses. The procedure is repeated on row 2 but at the end of condition:
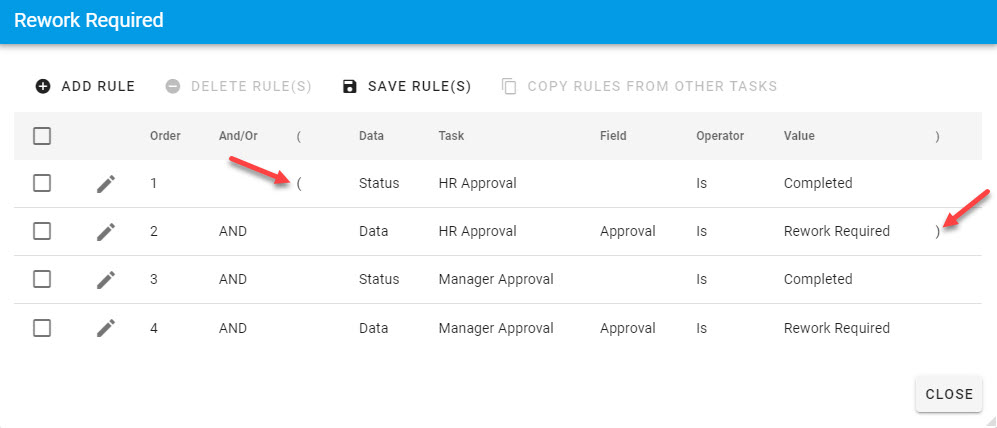
By grouping rows 1 and 2 together, it is effectively telling the Integrify workflow engine to evaluate those two rows as one condition.
Next, you would do the same for rows 3 and 4:
In addition to group rules, it is also necessary to change the bitwise (the and/or) operator in such cases.
In this example, we would want to change the operator starting at row 3 to indicate to Integrify that the grouping of rows 1 and 2 evaluate true OR the groups of rows 3 and 4 evaluate true for the task to start.
To change the operator, just click on the “and” and you will be presented with a drop-down list:

In this case, we select Or from the list and press the Save to commit the changes.

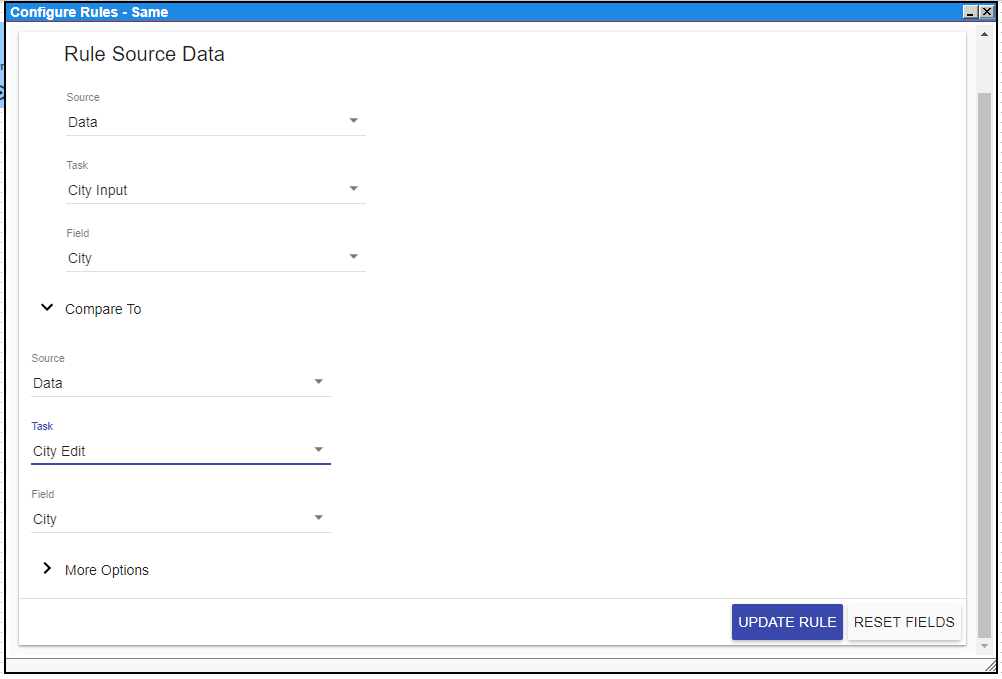
Compare To Option
The Compare To start rule option allows you to compare similar data from two different forms and evaluate if they are the same within a start task rule. Here is is an example of such a rule.
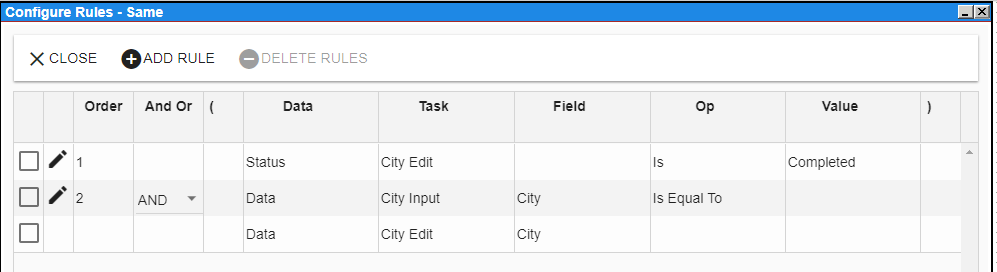
Here is the rule as it was being built:
More Options
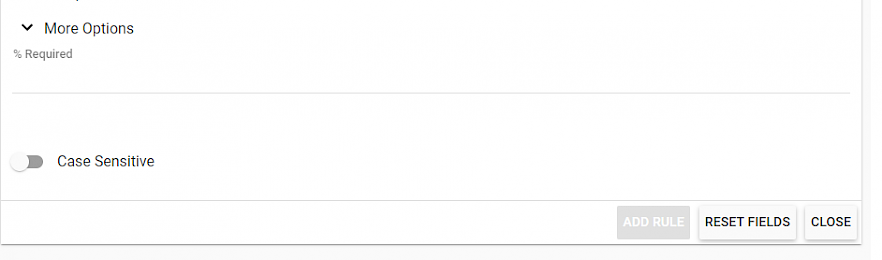
The % Required field under More Options allow you to implement a voting scheme with your task rules. The % Required field can be filled with a number value that can be used with a numeric operator such as Is Greater Than. An example of a rule requiring more than 50% of responses is shown below.
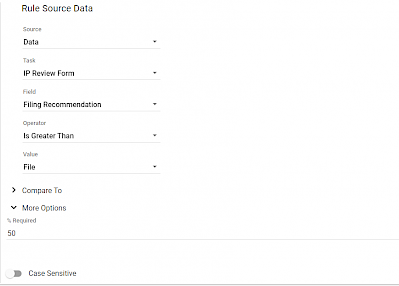
The Case Sensitive slider allows you to make this rule compare character values based on the letters found and their capitalization. So "use" would not equal "Use" if you were comparing the two character values with the Case Sensitive option set.